pcb-rnd knowledge pool
Installing and using imp_setup
| imp_setup by Tibor 'Igor2' Palinkas on 2020-06-07 | Tags: howto, imp_setup, impedance, high, frequency, signal, integrity, stripline, microstrip, waveguide |
Abstract: The impedance setup script is a user script that provides a simple, graphical, interactive way to set up layer group properties and routing styles to ensure trace impedance on transmission lines (e.g. microstrip). This node is a mini-howto for setting up and using the script.
1. Installation
- 1. download the script from edakrill, as a tarball or check it out from svn://svn.repo.hu/edakrill/trunk/user/igor2/script/pcb-rnd
- 2. install the script; follow steps 2 and 3 of the via tenting script installation
2. The dialog box
After loading the script the dialog box can be open by using the new menu plugins, script, "impedance setup...". The dialog box for microstrip looks like this:
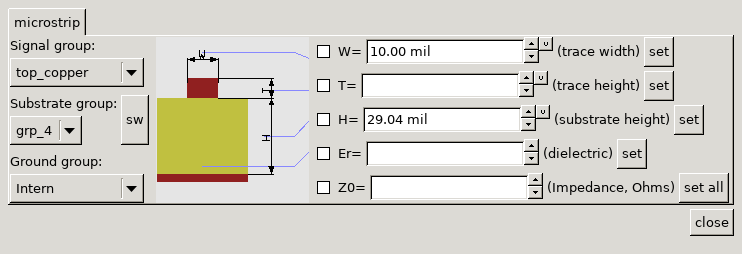
It automatically picks up the line width from the currently selected routing style and the layer thicknesses from the default selected layer group pair, which is top copper and the first internal copper group by default.
2.1. layer group selection
On the left, the copper layer group pair can be selected. The first selector always refers to the layer group of the signal, the second is the substrate group sandwiched between the two copper groups and the third is always the ground "plane" copper group. Note: the orientation of the widgets don't always reflect the orientation of the board. The sw button swaps the copper groups. The signal layer group must be either the top or the bottom copper layer group.
When group selection is changed, the right side values are automatically filled in and if any checkbox is ticked, the selected field is recalculated.
Upon invalid group selection the substrate layer group is emptied and the group-related right side values are reset.
2.2. cross section view
The cross section view is not interactive, it is only for information on the meaning of the right side data fields.
2.3. Right side data fields
Field values are copied from layer group attributes and route style properties but can be edited by the user. If one of the checkboxes are checked, the value of that field is calculated from the others using an approximation formula.
Each field that is bound to a layer group attribute or route style property has a "set" button. When the user clicks the set button, the current value of the field is copied to board data:
- for trace width, the currently selected routing style's trace width is set
- for heights and Er, the attributes of the layer groups selected on the left side of the dialog are modified
The "set all" button behaves as if the user clicked on each set button.
3. Using the script
- 1. click on the "new" button in the "route style" subdialog of the top window (normally on the bottom right)
- 2. modify the name of the new style to ustrip50top
- 3. close the route style edit dialog - note: the new style is selected now
- 4. open the dialog box using the menu
- 5. check layer group selection on the left: signal should be the top copper layer group
- 6. fill in trace height T with 0.035mm on the right side and click on the set button in the same line
- 7. fill in Er with 4.3 and click on the set button in the same line
- 8. fill in the Z0 impedance value with 50
- 9. tick in the checkbox for W
- 10. the script automatically recalculates the value of W, which should be about 55 mil
- 11. tick the checkbox for Z0 and round W to 55 mil
- 12. the script automatically recalculates Z0 to the final impedance value
- 13. click on the "set" button for W, so the "ustrip50top" style has 55 mil wide traces
- 14. close the dialog box
Now that the setup is done, drawing a microstrip line is easy:
- 1. make sure you are drawing it on the top copper layer
- 2. make sure there's solid ground under it on the next internal copper layer
- 3. make sure you use the "ustrip50top" routing style
The above setup ensures that:
- the layerstack is properly set up (layer thicknesses and dielectric constant values); this matters in simulation, DRC and some exports
- the routing style has the right wire thickness